A Refined Alpine Portable Baseline Setup
The last time I attempted this exercise, I left quite a few rough edges. Here’s a more polished and streamlined setup for a terminal centered portable.
Preliminary Notes
- This tutorial, if followed with my dDE.tar.gz bundle of patched suckless utilities notably will produce a sixel enabled build of the
stcourtesy of veltza/st-sx. If using a simplerstbuild, then many packages from the package file linked here can be excluded. - If you are not myself, please review any files I link and serve from this domain. These files and tarballs are here for my convenience. You may wish to import different packages or build different versions of some software.
Part 1 - Installation
Install Alpine using the setup-alpine script after booting the x84-64 extended image. A few choices during the installation that I found congruent with the intented use:
- We configure networking using the wireless adapter
wlan0 - This time we use
openntpdfor time - Do not set up an
sshserver, later we installopensshfor thesshclient. - Important: Error around the package mirror selection indicate a lack of network connectivity, probably due to mistyping the wireless passphrase. Such a type fails silently until this set.
- When selecting repositores choose
cto enable the community repository and thenfto choose the fastest mirror. - For the type of installation
cryptsys
Reboot and login in as root for the next part.
Part 2 - As Root Upgrade to edge
Workaround: If your machine has an unreliable real time clock, you can stop reading time from it with rc-update del hwclock boot. If needed, the earlier this is done, the better.
Let us install some packages that will assist in continuing the setup feel free to choose a different editor or use busybox’s built in vi when necessary:
apk add micro wget
Edit /etc/apk/repositories and change the version string from the numberic value to ’edge’. The edge upgrade is not strictly necessary.
Now upgrade your packages while the installed OS is still small
apk update && apk upgrade
Restart:
reboot
Log back in as root once again and proceed to the next part.
Part 3 - As Root, Get Ready for Xorg and Sow the Userland
Install graphics drivers, for recent Intel graphics this works like:
apk add mesa-dri-gallium mesa-va-gallium intel-media-driver
Note: The intel-media-driver is optional. Confirm which packages are necessary for your hardware.
Now, we set up a devd and populate the device tree. Other options may be viable, but this demonstration proceeds using udev from eudev to manage the device tree:
setup-devd
Choose udev, and choose y to populate the device tree.
Next we setup Xorg components:
setup-xorg-base
Now, mass install packages for your desired environment. Your desired packages may vary from what this command installs, but it is a start for a well equipped Unix portable:
wget https://aaronrogier.net/world-4.txt
apk add $(cat world-4.txt )
The wget command here downloads a text file with a list of packages. The $(cat world-4.txt reads the list for apk add which adds the packages to our /etc/apk/world file. The apk package manager works to bring the set of installed packages into a consistent set corresponding to the world file.
Important: A number of packages not explicitly listed in world will be installed to satisfy the dependency needs of the packages listed in world. At the time of testing ~100 packages were installed.
Once this completes, add your normal user to the users group like:
addgroup aaron users
You may optionally reboot before proceeding to the next part.
Part 4 - Banish wpa_supplicant for iwd
Note: Ensure openresolv and iwd are installed. This will be true if packages were added as in Part 3.
You may elect to reboot before proceeding to veryify your systems packages are in a consistent state.
To allow iwd to manage our wireless network, we need to depose the incumbents:
rc-update del wpa_supplicant boot
rc-update del networking boot
rc-upddate add iwd boot
Now edit your /etc/iwd/main.conf file as directed by the Alpine Wiki:
[General]
EnableNetworkConfiguration=True

[Network]
NameResolvingService=resolvconf
Ensure /etc/resolv.conf has some one or more nameservers listed like:
nameserver 9.9.9.9
nameserver 1.1.1.1
Now stop the wpa_supplicant and networking services, then start iwd:
rc-service wpa_supplicant stop
rc-service networking stop
rc-service iwd start
Now, with iwd re-establish network connectivity
iwctl
[iwd]# station wlan0 scan
[iwd]# station wlan0 get-networks
[iwd]# station wlan0 connect YourNetworkSSID
After entering your password, you can close the iwctl session:
[iwd]# exit
Verify that you have network connectivity:
ping -c4 google.com
Further wireless networks can be added and managed using iwctl as needed
Part 5 - Preparing the user environment
Reboot and log in with your normal user.
Grab your desktop environment sources:
~$ wget https://aaronrogier.net/dDE.tar.gz
~$ tar -xvzf dDE.tar.gz
Or clone the original repositories. You may try st with or without sixel support for images in the terminal:
~$ mkdir dDE
~$ cd dDE
~/dDE$ git clone https://git.suckless.org/dwm
~/dDE$ git clone https://git.suckless.org/dmenu
~/dDE$ git clone https://git.suckless.org/st
~/dDE$ git clone https://github.com/veltza/st-sx
Build a window manager
~/dDE$ cd dwm
~/dDE/dwm$ doas make clean install
Build dmenu:
~/dDE/dwm$ cd ..
~/dDE$ cd dmenu
~/dDE/dmenu$ doas make clean install
Build st:
~/dDE/dmenu$ cd ..
~/dDE$ cd st-sx
~/dDE/st-sx$ doas make clean install
Return to home:
cd ~
Make a .xinitrc file with contents like:
while true; do
xsetroot -name " $(date) | $(acpi -b |awk '{print $3, $4, $5}') "
sleep 1
done &
feh --bg-center ~/.config/yesman.jpg &
xautolock -time 15 -locker slock &
/usr/bin/setxkbmap -option compose:ralt &
exec dbus-launch --exit-with-session dwm
You can micro .xinitrc and paste the contents. Ensure the file ends with a blank newline to meet POSIX file expectations.
Make a .profile with contents like:
startx
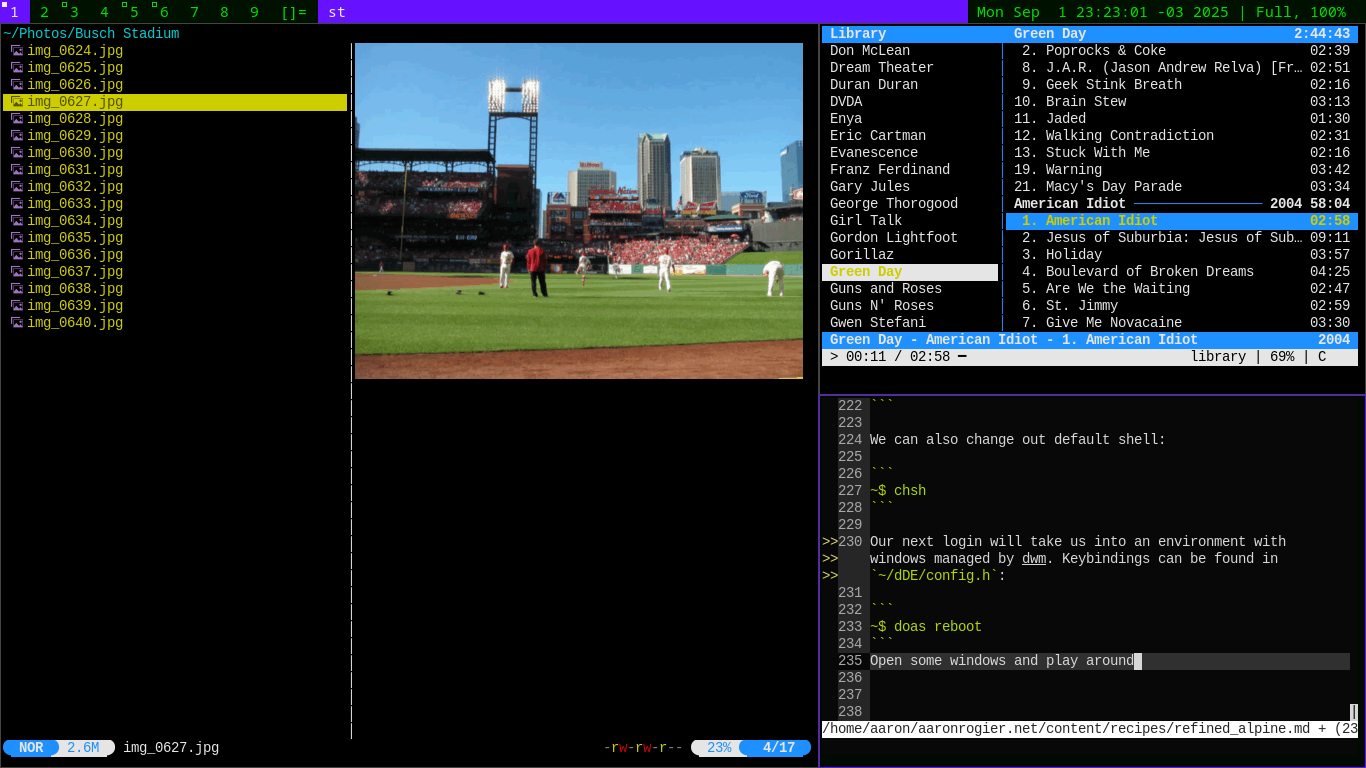
We can also change out default shell:
~$ chsh
Our next login will take us into an environment with windows managed by dwm. Keybindings can be found in ~/dDE/config.h:
~$ doas reboot
Open some windows and play around:
There’s still more room to polish the edges, but as configured here we have a installation that provides a variety of tools for a terminal centered experience with multimedia tools like nsxiv, cmus, mpv, and youtube-tui.